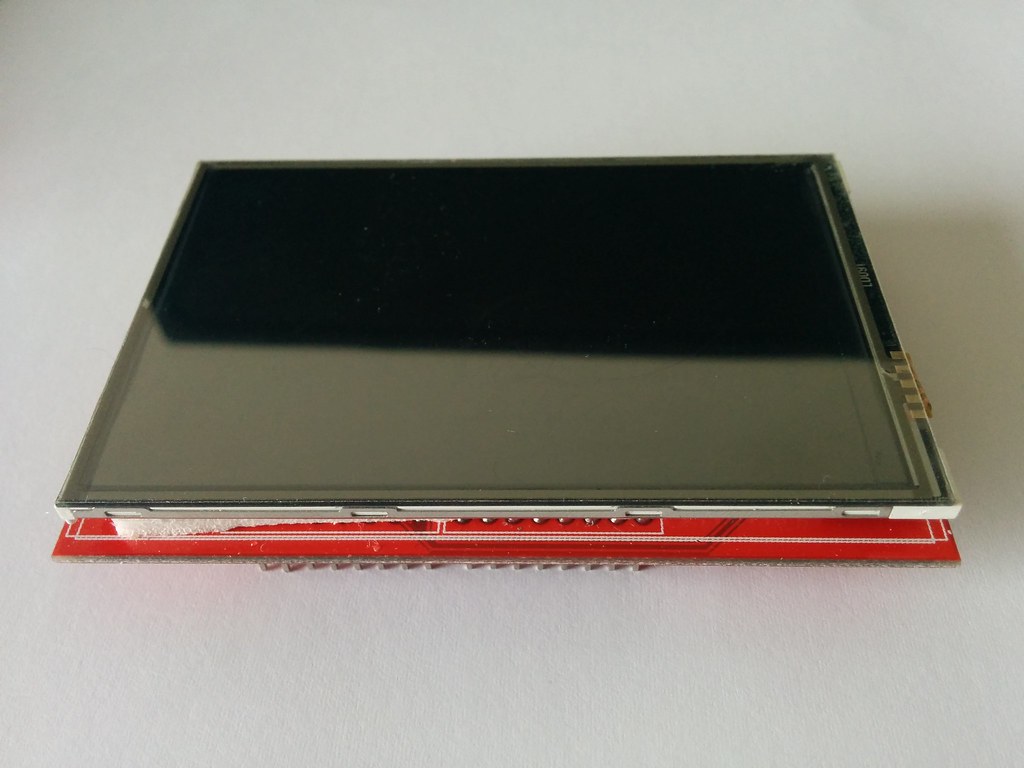
I bought this Mcufriend touch screen. It’s the unbranded version of this one sold by Adafruit.
I got it for $10 compared to Adafruit’s price of $40. I came across the screen through this awesome video by Charles Cole where he walks through his FPGA implementation of a Z-Machine. I also bought the Altera mini dev board he recommends ($20 which is a steal) but that’s another post.
My gameplan is
- To first get it working on Arduino (since there is information available online on how to do so).
- Once it works on Arduino, convert the relevant files (driver, graphics) from C, Python, or whichever language is used to Hack Computer’s high level language.
- Then change a few things here and there on the Hack Computer so that it outputs for the LCD screen instead of Tkinter.
Part 1) Getting the screen to work
Looking back, I see why someone would opt to shell out the extra cash for Adafruit’s (essentially) plug and play touchscreen. On the otherhand, I learned quite a bit about how the LCD works which will be useful when attempting to translate the relevant driver code into the Hack HL language.
Here’s a list of sources I used to get the screen working:
- LCD Screen
- Touch Screen
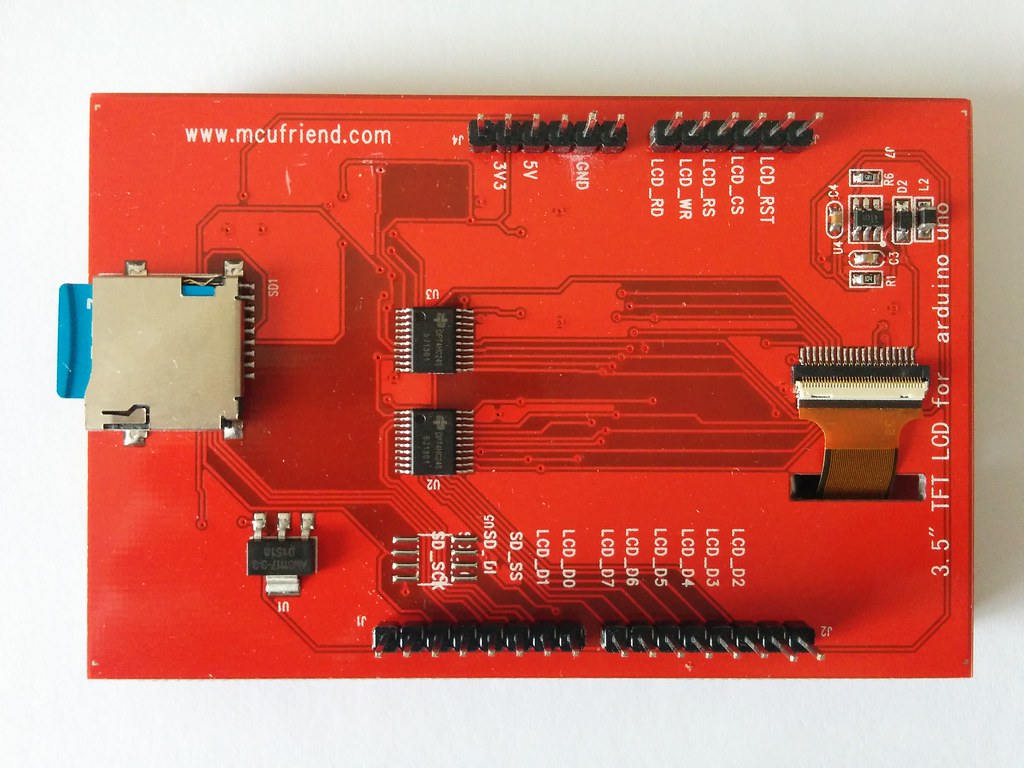
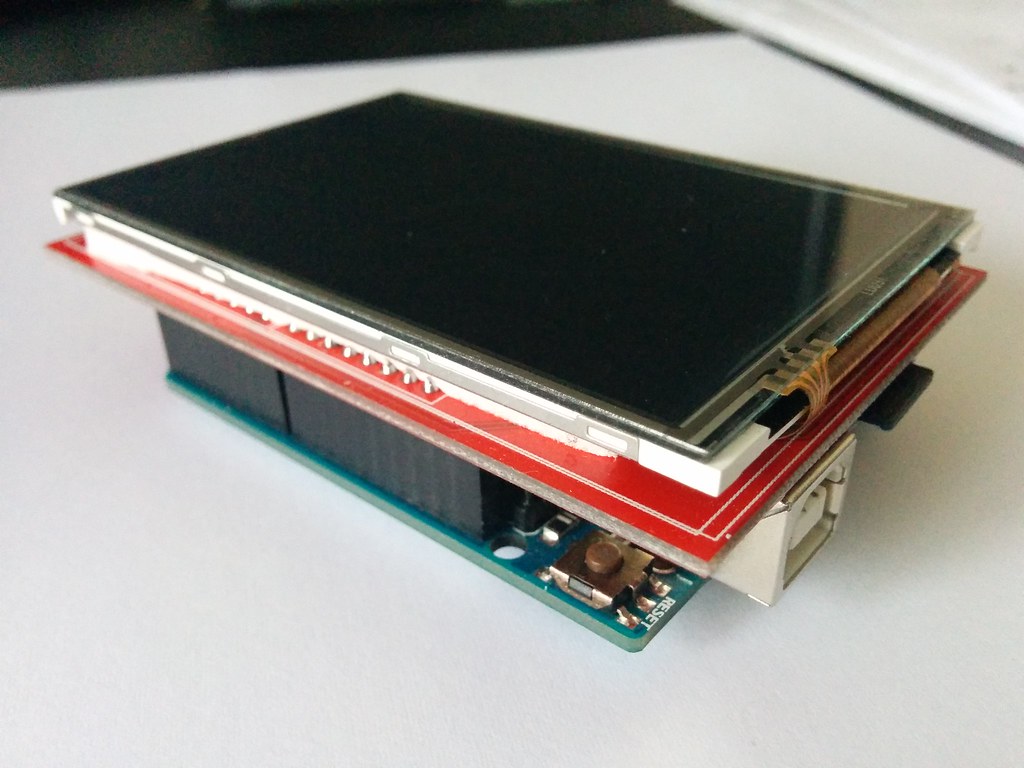
The screen is designed as an Arduino shield, so connecting the two is as simple as plugging them together.
The pinouts are as follow:
Arduino | Mcufriend Shield
  *D7   |     D7 & X+
  *D6   |     D6 & Y-
   D5   |     D5
   D4   |     D4
   D3   |     D3
   D2   |     D2
   D9   |     D1
   D8   |     D0
   A0   |     RD
  *A1   |     WR & X-
  *A2   |     RS & Y+
   A3   |     CS
        |
  D13   |     SD_SCK
  D12   |     SD_DI  // MISO
  D11   |     SD_DO  // MOSI
  D10   |     SD_SS

*Shared ports. Used by both the LCD ( data in ) and touch ( data out ) screens.
I used the following libraries:
After plugging in the LCD, I uploaded the graphicstest sketch (included in the Adafruit TFT LCD library) onto the Arduino. The guide shows how the graphicstest should look when working correctly. All I got was a blank screen. Here are the various changes I made to get the Arduino communicating with the LCD:
In Adafruit_TFTLCD.h, left this line commented out. Despite the Mcufriend LCD being a shield, it only worked with the breakout board pinout.
//#define USE_ADAFRUIT_SHIELD_PINOUT 1`
Additionaly I changed some lines of code in the Adafruit_TFTLCD.cpp file as follows:
1) Updated the device resolution,
#define TFTWIDTH 320
#define TFTWIDTH 480
2) Forced the function Adafruit_TFTLCD::readID(void) to return a driver id of 0x9341,
uint16_t Adafruit_TFTLCD::readID(void) {

  return 0x9341; // Mcufriend hack. Force it to recognize the LCD driver as ILI9341.

  // uint8_t hi, lo;

  // /*
  // for (uint8_t i=0; i<128; i++) {
  //   Serial.print("$"); Serial.print(i, HEX);
  //   Serial.print(" = 0x"); Serial.println(readReg(i), HEX);
  // }
  // */

  // if (readReg(0x04) == 0x8000) { // eh close enough
  //   // setc!
  //   /*
  //     Serial.println("!");
  //     for (uint8_t i=0; i<254; i++) {
  //     Serial.print("$"); Serial.print(i, HEX);
  //     Serial.print(" = 0x"); Serial.println(readReg(i), HEX);
  //     }
  //   */
  //   writeRegister24(HX8357D_SETC, 0xFF8357);
  //   delay(300);
  //   //Serial.println(readReg(0xD0), HEX);
  //   if (readReg(0xD0) == 0x990000) {
  //     return 0x8357;
  //   }
  // }

  // uint16_t id = readReg(0xD3);
  // if (id == 0x9341) {
  //   return id;
  // }

  // CS_ACTIVE;
  // CD_COMMAND;
  // write8(0x00);
  // WR_STROBE;     // Repeat prior byte (0x00)
  // setReadDir();  // Set up LCD data port(s) for READ operations
  // CD_DATA;
  // read8(hi);
  // read8(lo);
  // setWriteDir();  // Restore LCD data port(s) to WRITE configuration
  // CS_IDLE;

  // id = hi; id <<= 8; id |= lo;
  // return id;

}
The Mcufriend driver reads as “Unkown LCD driver chip”… I tested the four drivers (932X, 7575, 9341, HX8357D) already implemented by Adafruit in the code and the 9341 worked. If none had worked, I would have found myself in a sticky situation. (I would have to either identify the driver installed on the LCD, then find and read the related docs (look at the size of these docs!), so that I can write the magic code needed to interface with it. Or fork up the cash for Adafruit’s LCD shield).
3) Added code to invert colors
The 9341 driver worked, but the colors were inverted. For example black appears as white. Blue as magenta. I could technically write all future programs with this in mind, for example type ‘white’ when I want something to appear ‘black’ but that would be a PITA. I could alternatively read the driver manual and try to figure out why the colors are inverted and change the magic code accordingly… which would also be a (grueling) PITA. I instead opted to write some code that would invert the color right before it was sent to the LCD.
To invert a color, you subtract it from white (0xFFFFFF). For example the inverse of blue (0x0000FF) is magenta (0xFFFF00).
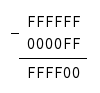
or in binary,
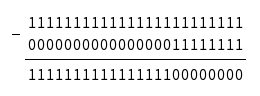
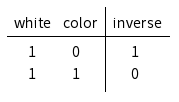
I wanted to have minimal impact on the program speed, so I implemented the subtraction using bitwise operators. The truth table for the subtraction matched that of a XOR gate
So the code to invert a color was simply,
#define WHITE 0xFFFF  // 16 bit
...
color = WHITE ^ color;  // anywhere color is being sent to the screen
The snippet was applied to the flood, drawPixel, and pushColors functions.
void Adafruit_TFTLCD::flood(uint16_t color, uint32_t len) {
  color = WHITE ^ color;  // invert
  // rest of the code untouched
}
void Adafruit_TFTLCD::drawPixel(int16_t x, int16_t y, uint16_t color) {
  color = WHITE ^ color;  // invert
  // rest of the code untouched
}
void Adafruit_TFTLCD::pushColors(uint16_t *data, uint8_t len, boolean first) {
  ...
  while(len--) {
    color = *data++;
    color = WHITE ^ color;  // invert
    ...
  // rest of the code untouched
}
A Fool's journey...
After the above changes, the screen finally ran the graphicstest demo properly. But something was still not quite right. It was way too noisy.
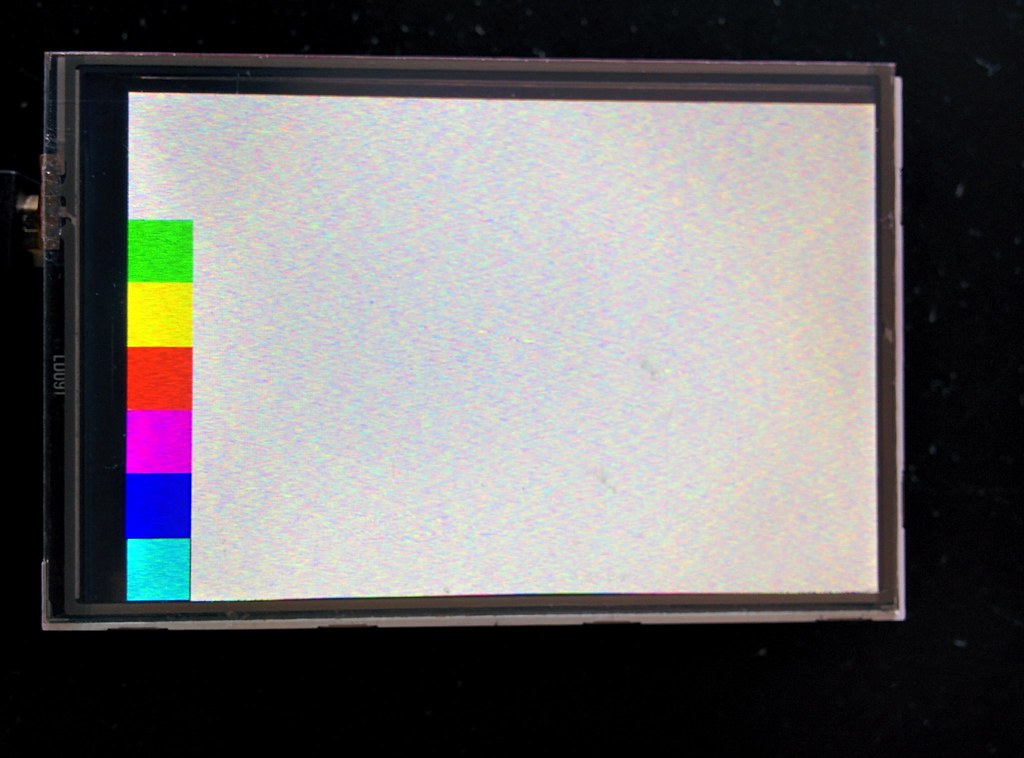
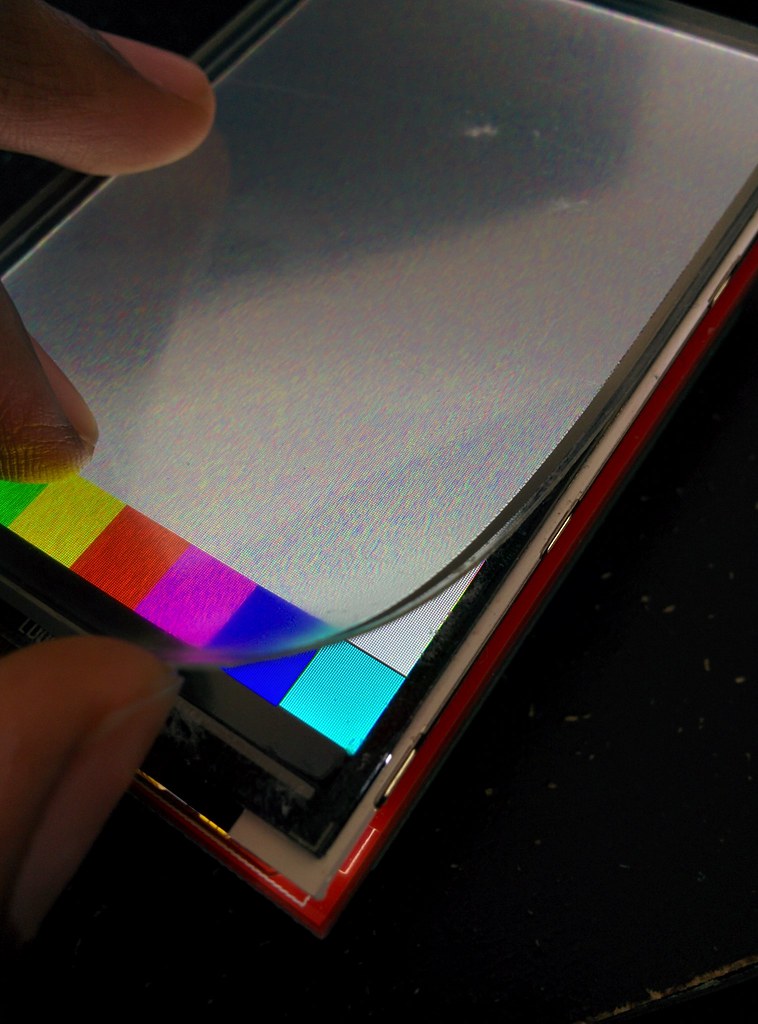
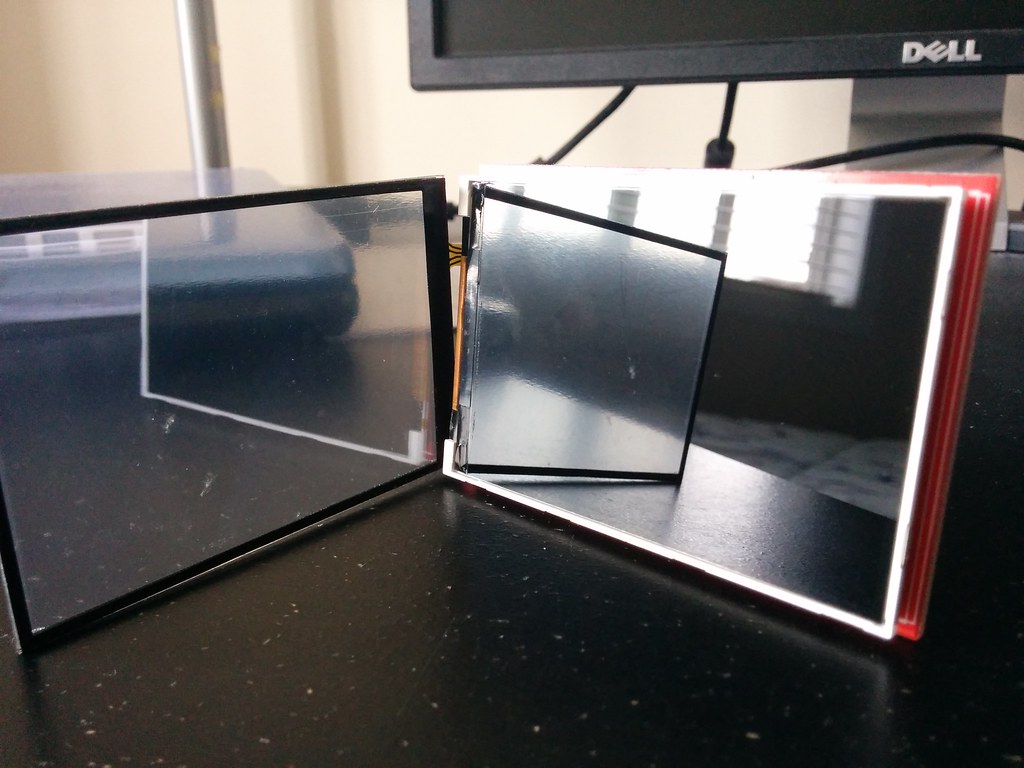
At first I though it was a software problem. But much googlefu later I found nothing. The following day I looked more closely at the noise. The more I looked at the screen the less digital it seemed. Depending on which angle you looked at the screen, the noise pattern changed and didn’t seem to follow the grid layout of the pixels. Given how relatively cheap the screen was to buy, I decided to peel off the touch screen layer that sits atop the LCD to verify whether it was the code or something physical causing the fuzziness.
Frosty. Not dirty per se, but also not optically clear.
At this point I was pretty bored and considered just using the screen without the touch screen layer. Guess this is what you get for $10, some cheap thing tacked on to claim ‘touch’ support.
But then, wait. It can’t be… Are you serious?
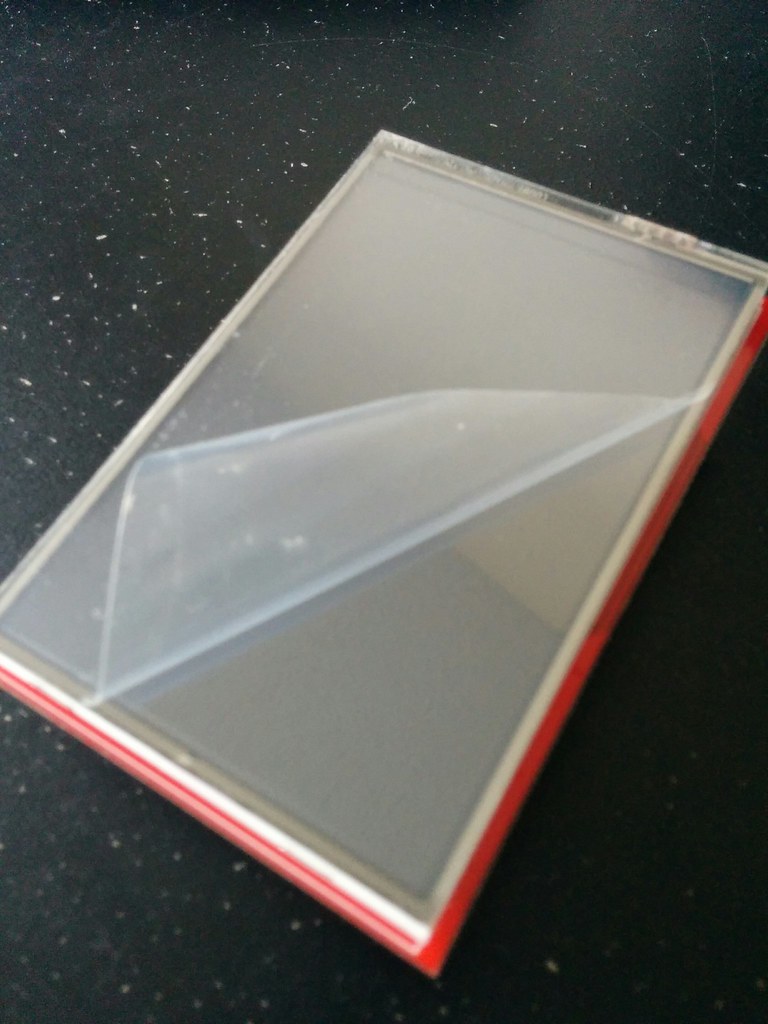
Facepalm!
The touch screen had one of those ultra thin anti-smudge/protective film thingies… So thin that I missed it the several times I was looking for it. Did I mention facepalm? With the film removed, the screen was crystal clear.
Setting up the touch screen
To get the touch screen to work was relatively straightforward.
For the tftpaint example,
1) I got the right output pins from Joao Lopes and changed the code accordingly.
#define YP A2  // must be an analog pin
#define XM A1  // must be an analog pin
#define YM 6   // can be a digital pin
#define XP 7   // can be a digital pin
2) And changed the mapping code
// p.x = map(p.x, TS_MINX, TS_MAXX, tft.width(), 0);
// p.y = map(p.y, TS_MINY, TS_MAXY, tft.height(), 0);

p.x = map(p.x, TS_MINX, TS_MAXX, 0, tft.width());
p.y = map(p.y, TS_MINY, TS_MAXY, 0, tft.height());
All the other defaults worked. I will probably move these settings to a shared config file so that they don’t have to be defined repeatedly by each program that uses the touch screen.
So that was part 1 of the screen gameplan. Stay tuned for parts 2 and 3. I anticipate part 2 (code translation from C++ to Hack HL) to be rather painful, and part 3 (connecting to the Hack hardware) a relative walk in the park. We shall see.