Musings of a Fondue

Visualizing Quantum Computing

It’s been a while since I’ve last made a post. A few things have happened since. One of the big ones is that I got the opportunity to attend the Recurse Center at the beginning of this year. I plan on writing a separate post on my experience.

Today, I wanted to talk about one of the things I’ve continued to be a part of since my batch ended. During my batch, I somehow found myself a part of the quantum computing study group started by Ryan Prior. In the study group, we have been working through the Quantum Country essays by Andy Matuschak and Michael Nielsen. The essays are intended to be a gentle introduction to the field.

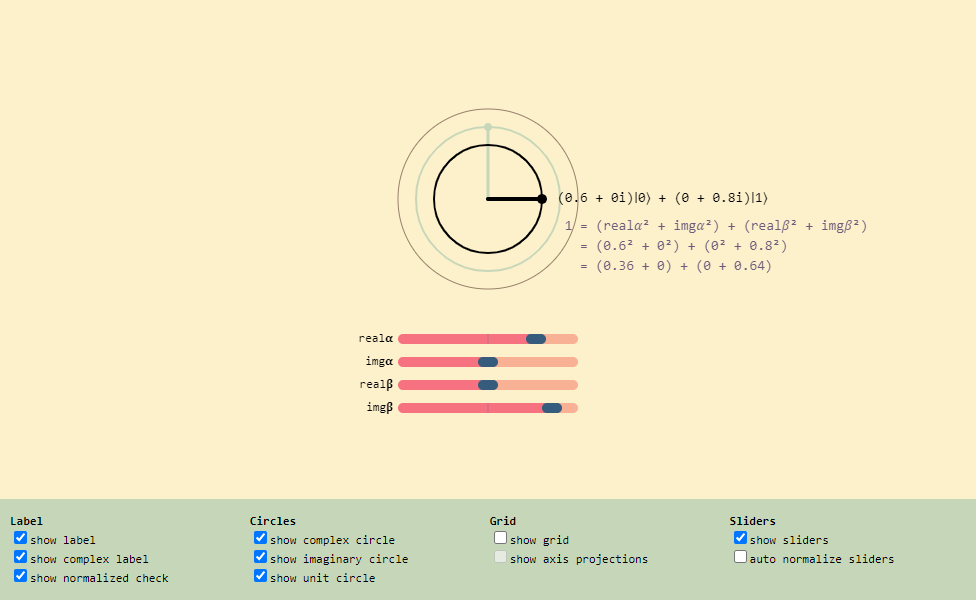
I joined the group with zero knowledge of how quantum computers worked, so it has been quite a surprise to learn how much of a central role math plays! As we work through the essays, some of our goals are to document our findings (through an Observable notebook), create interactive visualizations that help with building intuition on the concepts presented, and to have a working quantum computer simulator at the end.

Windowing System Tutorial

I plan to have a graphical interface in the homebrew computer. To this end, I am learning about windowing systems.

- Overview -

The main components of a windowing system seem to roughly be:

  • hardware interfacing
    • communicating with input (mouse, keyboard) and output (screen) devices
  • state management
    • tracking the state of a window. For example its position, size, parent, children, visibility
  • rendering
    • determining the most efficient way to draw a window
    • adding window decorations
  • window server and client communication
    • the server notifying clients of events (eg. mouse move, window exposed)
    • clients sending requests to the server (eg. change window title, get contents of clipboard) and receiving responses from the server (eg. contents of clipboard)

- Tutorial -

I came across Joe Marlin’s awesome Windowing Systems By Example tutorial series (archived here). In it, we are shown how to create a simple stacking window manager. It uses clipping regions to draw/update only the visible parts of a window. The series covers the “state management” and “rendering” parts of a windowing system.

Xv6 Mods

Xv6 is a simple operating system (based on Version 6 Unix). It was created as a teaching aid and as such has a relatively small code base. It also comes with a book which explains how its key components work.

The small size and generous documentation (commentary book, lectures) makes it an excellent candidate for my homebrew computer. My goal is to understand the OS completely, so that I can adapt it for use on the computer.

- Applications -

Xv6 is intentionally lightweight. As such it comes with only a few user-space utilities (all command-line based):

  • cat
  • echo
  • grep (minimal)
  • kill (minimal)
  • ln
  • ls (minimal)
  • mkdir
  • rm
  • sh (minimal)
  • wc

This is great for teaching, but poor for usability. To make the OS more useful, I plan to grow the number of user-space utilities.

Laminator Repair

I bought a laminator. I was able to get it for a good price because it was sold as “not working”.

Misadventures of Removing a Dual Boot Setup - Part 3/3

- Disclaimer -

This is a writeup of my experience. It is not a “HOW-TO” guide. If you choose to apply the contents of this post, you do so at your own risk.

- Preamble -

Back in Step 1 - Remove Ubuntu partitions, I managed to successfully delete the Ubuntu partitions. Unfortunately, the Recovery partition lay in-between my C-drive and the new unallocated space. This prevented me from being able to add the space to the C-drive using Disk Management.

Misadventures of Removing a Dual Boot Setup - Part 2/3

- Disclaimer -

This is a writeup of my experience. It is not a “HOW-TO” guide. If you choose to apply the contents of this post, you do so at your own risk.

- Step 3 - Murphy -

More likely than not, something will go wrong. What goes wrong varies widely, and likewise how to resolve it. What follows is what failed in my case, and how I got around it.

Misadventures of Removing a Dual Boot Setup - Part 1/3

- Disclaimer -

This is a writeup of my experience. It is not a “HOW-TO” guide. If you choose to apply the contents of this post, you do so at your own risk.

- Why -

I had previously configured my computer to host two operating systems: Windows 10 and Ubuntu (Linux). However, the dual boot setup is inconvenient. Only one operating system can run at a given time. To use the other, you have to restart the computer and boot into it. As such, I almost never use my Ubuntu OS. It’s just sitting there taking up valuable disk space.

- Overview -

The standard procedure to remove a Dual Boot setup (at the time of writing) seems to be this:

  1. Remove the Ubuntu partition
  2. Repair the Windows boot loader

Simple PCB

Just a simple “led and resistor” circuit to test the end-to-end process of making a circuit board.

Unfortunately, I forgot to flip the image before printing, and only noticed after the board was already etched.

pcb

lights on

DIY PCB Etching

I wanted to learn how to etch PCBs at home. (Read as too cheap to pay someone else to do it). I was pleasantly surprised by the results.

- Board prep -

I lightly sanded the copper layer with 800 grit sandpaper (it was the finest grit I had on hand) to remove the oxide layer. I then rinsed it with water and wiped with isopropyl alcohol.

- Transfer -

I used the “printer toner and iron” method to transfer the design onto the copper. (Why - cheap). Steps:

  1. Tape magazine paper onto regular paper
  2. Print your design onto said magazine paper using a laser printer
    • make sure to mirror (vertical flip) the design before printing. I forgot to do this.
    • when printing, select the highest resolution (dpi) your printer offers
  3. Place the paper on top of the copper board
  4. Iron it
    • this transfers the toner to the copper board
    • I had my iron set to the highest temperature but ymmv

When it seemed like the toner had transfered, I soaked the board in water then gently peeled off the magazine. See this video for an example.

The design:

The toner transfer:
toner transfer

Phone Repair: Part 2 - Screen

After what feels like years, the screen finally arrived!

I ordered the screen and frame assembly. Though it costs more and you loose the OEM frame, installation is much easier. Rather than trying to peel off the cracked screen and glue in a new one, you can “just” swap components from the old frame to the new one.

The quality of the assembly is great for a replacement and the price I paid. The flex cable looked a bit worn… maybe the screen was a salvage? The frame is of a lower quality than the OEM frame, but this is to be expected.

Tools useful for this repair:

  • spudger (essential for removing the back cover and battery)
  • heat gun (or blowdrier) for softening adhesives
  • 300LSE double sided tape (not critical but nice to have)

In the image below, I am testing that the screen works before moving components from the old frame to the new one:

IMG_20180915_191854

Phone Repair: Part 1 - Power Button

I dropped my phone one too many times. This time the screen gave in and shattered.1 Whether related or not, my power button soon failed after and my phone was unable to boot. It would get about a second into the boot process before restarting again, as if the power button was constantly being pressed. The behaviour was the same even in recovery mode indicating that it was likely a hardware rather than software problem.

A Google search revealed that failure of the power button is a common problem with the Nexus 5. I tried the easy solution of partially disassembling the phone to get at the button and clean it, its rubber pad, and the surrounding area with isopropyl alcohol. Unsurprisingly, it didn’t work.

In my search, I came across this awesome article by Gregor van Egdom. It has a great explanation and photos of how this particular button works and why it likely fails. His solution is to replace the button. So I went ahead and ordered a replacement from Ebay ($5 with shipping from the US (I could have gotten it cheaper but I wanted it now rather than later as my phone was unusable)).

James Molloy OS Tutorial

I wanted to get my feet wet with regards to writing operating systems from the ground up. I came across this awesome tutorial by James Molloy. In it, he walks through the creation of an ultra minimal unix-like operating system.

— Setup —

Setting up my environment took quite a bit of time. The setup instructions are aimed at a Linux/macOS environment whereas I am running Windows. Luckily, Windows Subsystem for Linux (WSL) is a thing and I was able to continue along. However, there was a catch - WSL does not have a graphical user interface (GUI).1 This meant I could not use Bochs (the emulator used in the setup instructions).2

Intel 8080 Emulator

I started down this journey a bit randomly. I was researching how the Game Boy uses memory bank switching when I came across this video1 in which the author attempts to emulate the Game Boy. Since the Game Boy’s CPU is a hybrid of the Intel 8080 and Zilog Z80 processors, they start out by implementing the 8080’s instructions. Though my initial intent was to learn about memory bank switching, seeing this inspired me to set off and create an 8080 emulator.

I lucked out in my choice to emulate the 8080. It turns out that retro CPUs are orders of magnitude simpler to understand than modern ones and that the 8080 is one of the earliest. As a byproduct of this simplicity, their documentation are detailed while remaining reasonable in size (i.e. readable). (Contrast the less than 300 pages of the 8080 User’s Manual with the almost 5000 pages of Intel’s current 64 and IA-32 Developer’s Manual!)

FFmpeg Snippets

Scripts for useful FFmpeg actions. Posting for future reference. Perhaps others will also get use from them.